How to Get a Free Custom Domain Email Address
Step-by-Step Guide for getting a custom domain email address
Practically every site, no matter what it does and who its audience is, needs an email as part of its brand and communications. The first impression that an email domain can make can vary greatly depending on if your email domain ends in something typical @gmail.com, or if it ends in a unique domain email that ends with something like @yourdomainhere.com. Domain emails are seen as being much more professional and credible when compared to generic email domains that you’d get from email addresses created with email providers like Gmail, Yahoo, and Hotmail. This is why having a custom domain email is key to developing strong trust and credibility in the minds of consumers and your clients.
In this article, you’ll learn how to create and use email domains, and how to gain access to unlimited free email accounts using cPanel when you have a web hosting subscription plan.
Get free custom domain emails with web hosts
Part 1: Get Access From Your Hosting Provider
For our guide, we’ll be using Doteasy as our hosting provider to demonstrate how to set up and use free email domains. We’ve chosen Doteasy because they’re one of the very few web hosts that offer domain email accounts as a standard feature in their web hosting, rather than selling email services as add-ons through providers such as Google or Microsoft. This makes accessing a custom email through their services more convenient and affordable for anyone to get started with regardless of their previous experience levels. We contacted Doteasy to review their services and we were provided with an account to use.
Get started by signing up with your web hosting provider. In our case, we’ll head to the Doteasy website and complete their sign up process. Every step should be self-explanatory, so we’ll just quickly stop to mention that we recommend you sign up with the Starter Hosting plan, since it’s geared towards those just starting up a website, and is great for anyone looking to develop or further their knowledge of running a website.
Once you’ve created your account and are signed up for a hosting plan, you now have access to creating email addresses that you can use. You can create email addresses for any purposes you could think of, and thanks to their custom domain name, they’ll be much more professional and credible than other basic email addresses.
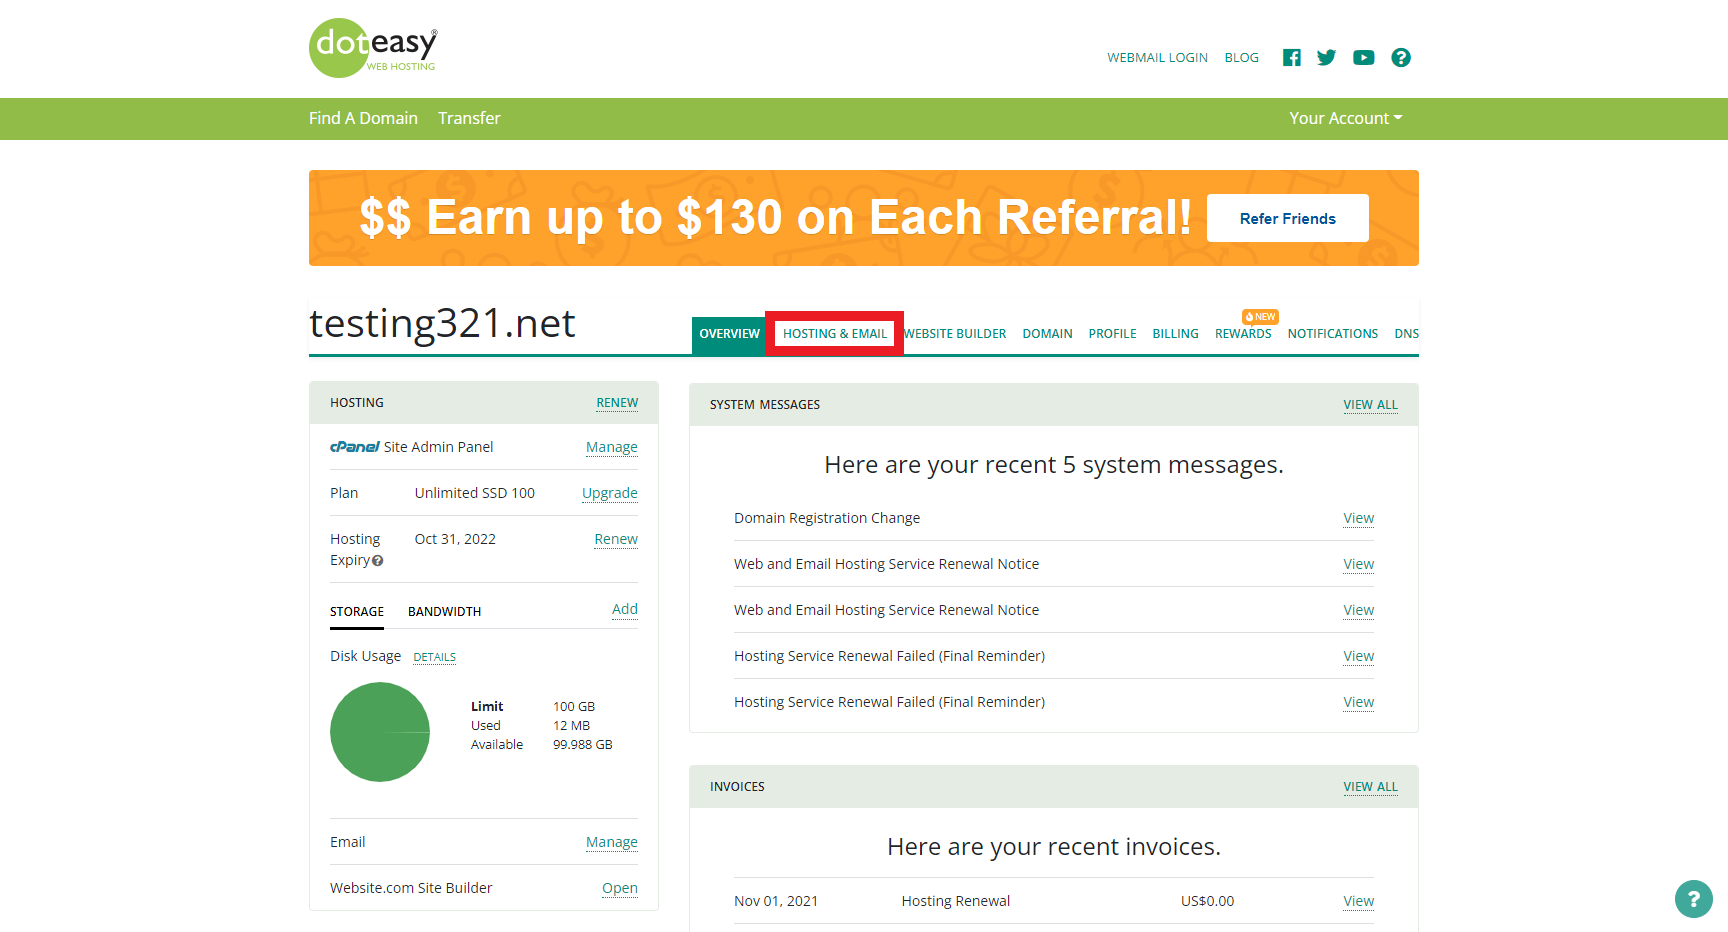
First, head to the Doteasy website and log into your account by clicking “Member Login” in the top right corner of the page. From here, you’ll be brought to the Member Zone. To the right of your domain’s name will be a series of tabs you can click into. Click the “Hosting & Email” tab.
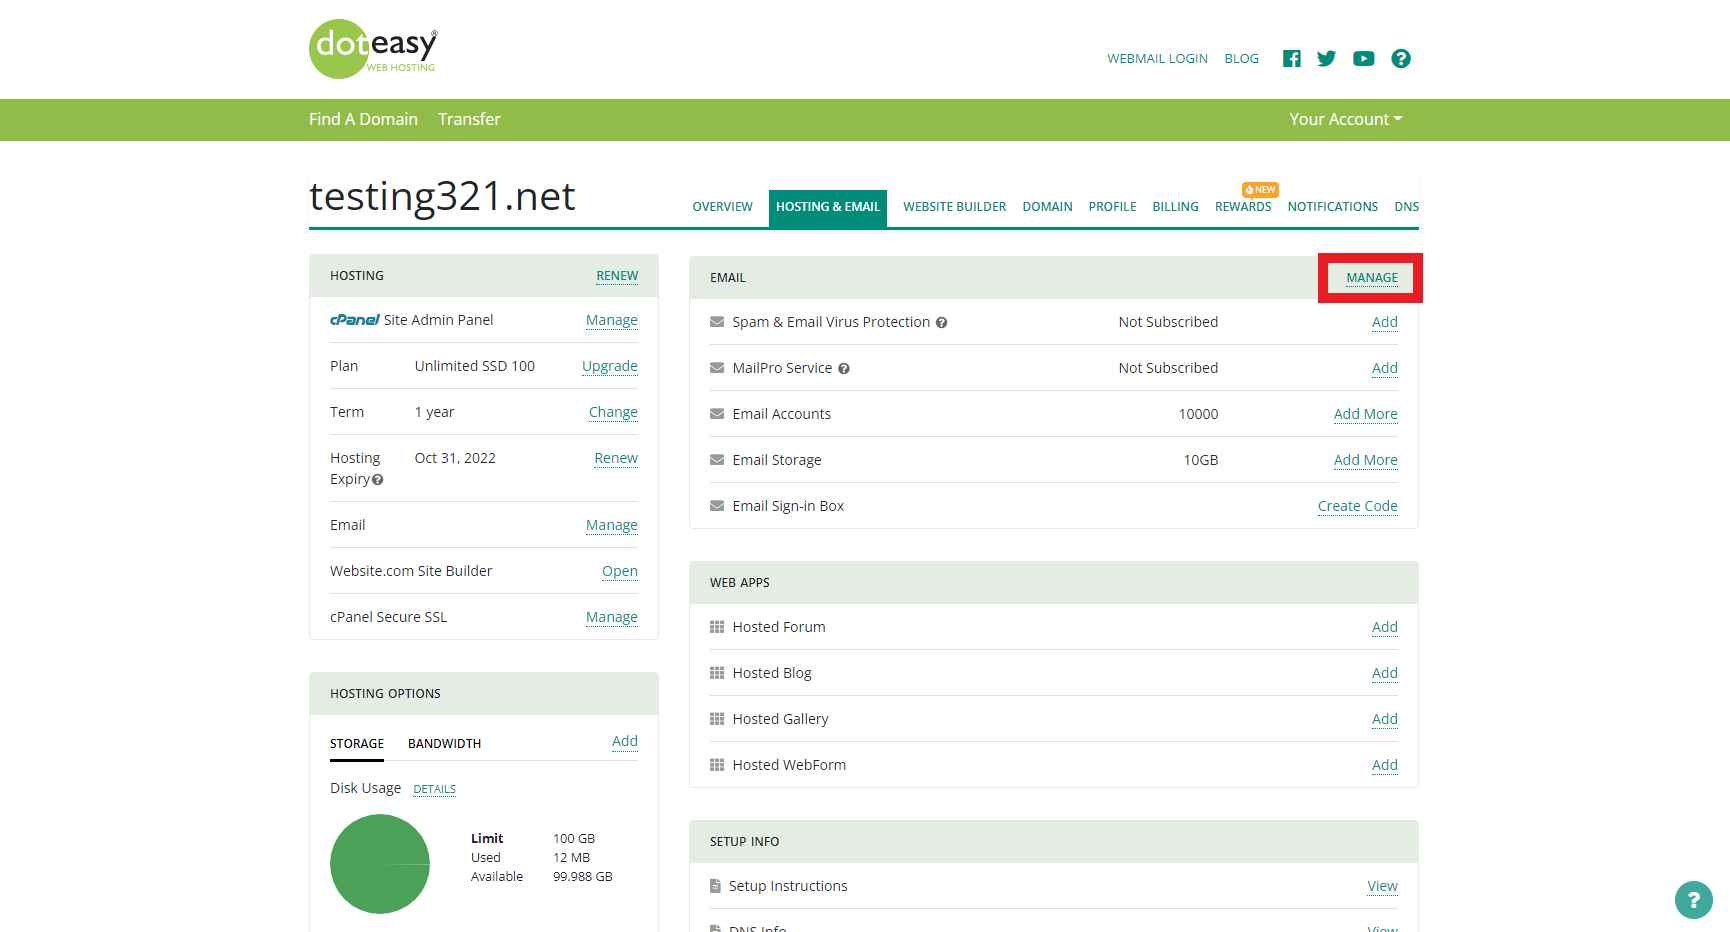
You’ll be brought to a new interface that lets you configure different aspects of your site. In the “Email” tab, click “Manage”.
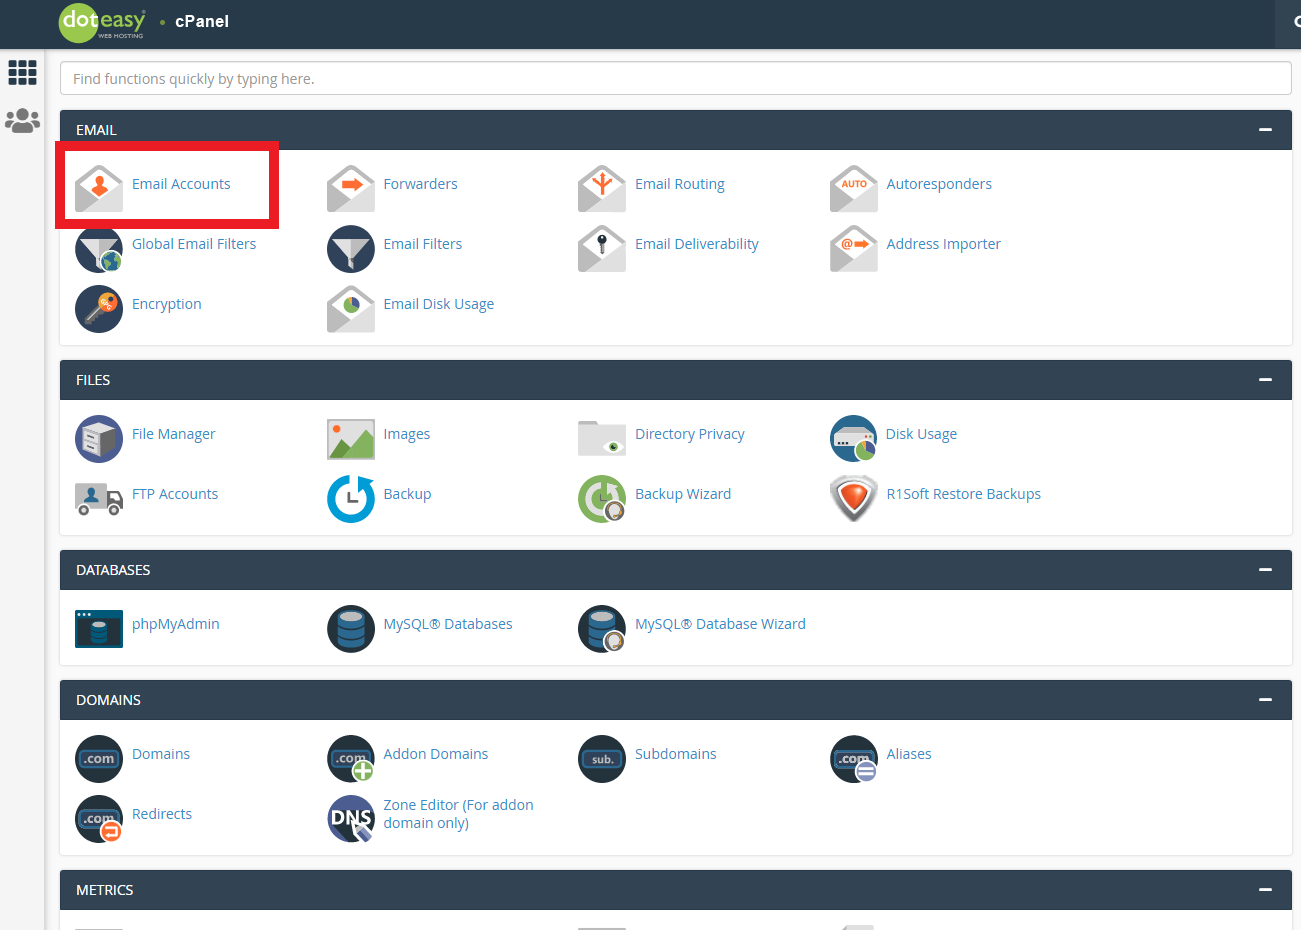
You’ll now find yourself in the cPanel dashboard. Under the “Email” tab here, click “Email Accounts”.
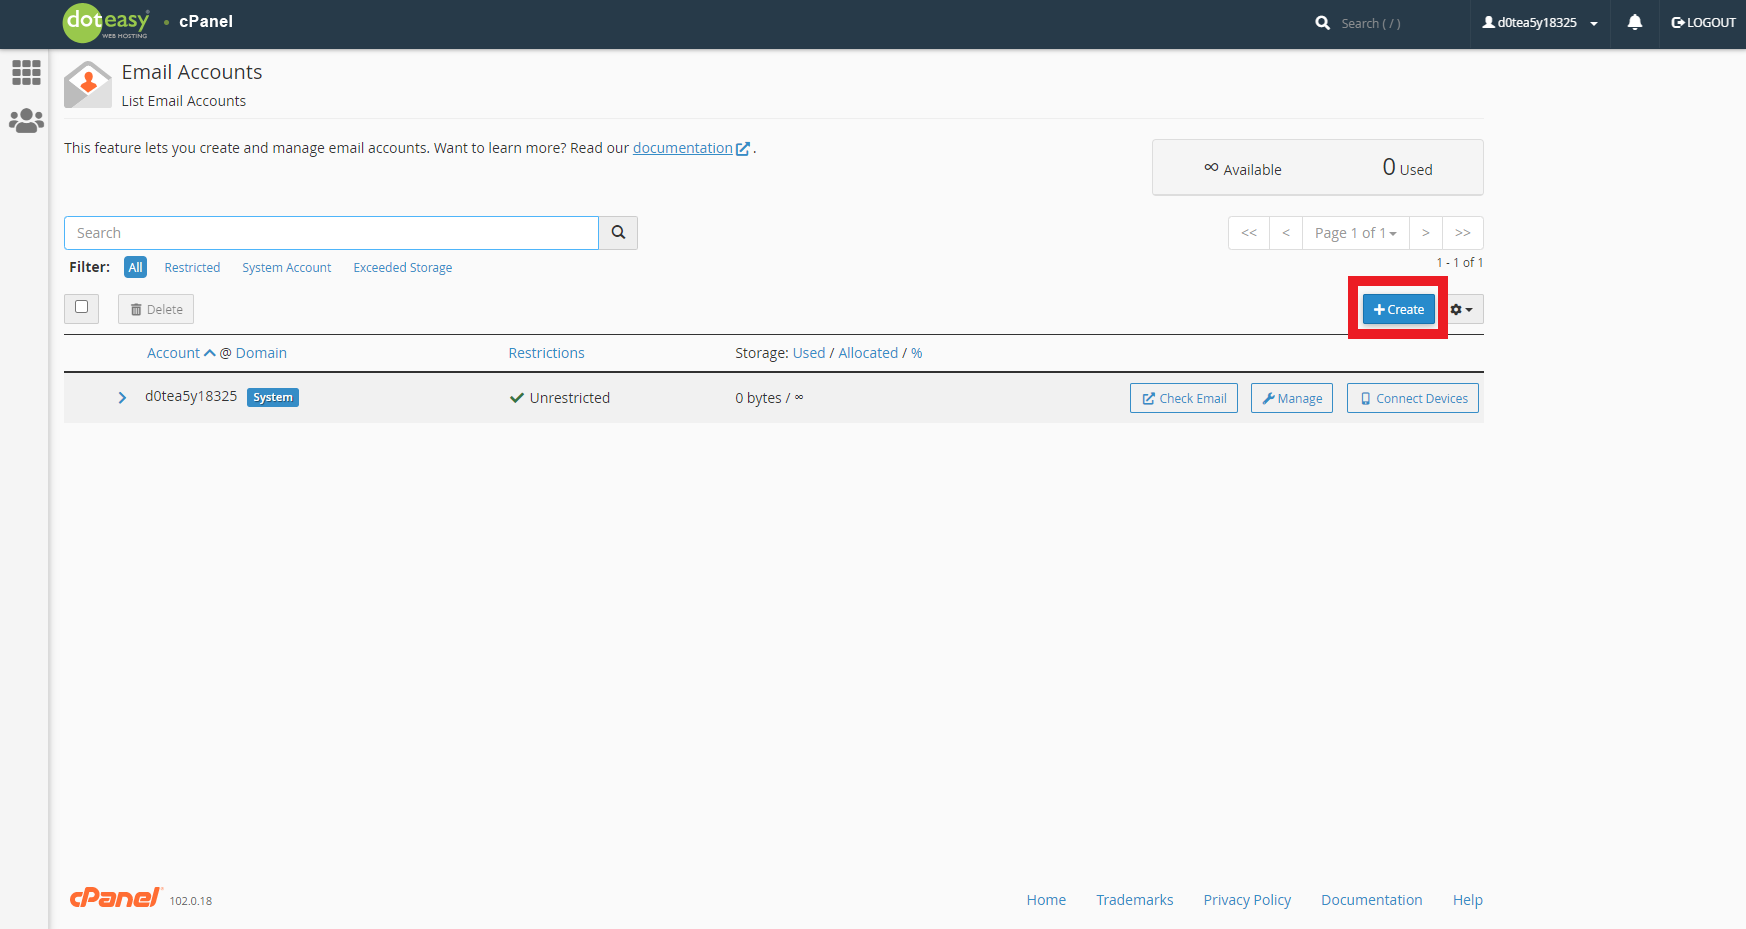
You’ll be brought to a new page that shows you all the email addresses tied to your web hosting account. You’ll see an email address that already exists, which is your administrative email address for your account. To create new email accounts, click the “Create” button to the right of the page.
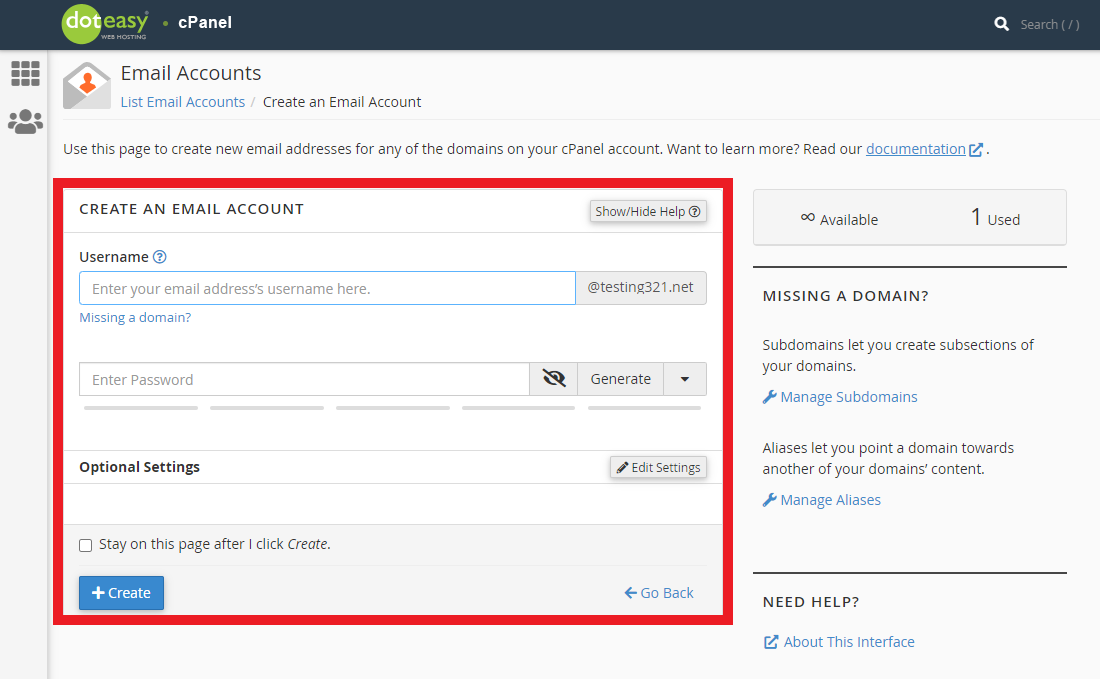
This opens up an interface in which you can change the details of a new email account you’re creating. Fill in the information you need for the account creation process, then click “Create”.
Part 2: Using Your Custom Domain Email
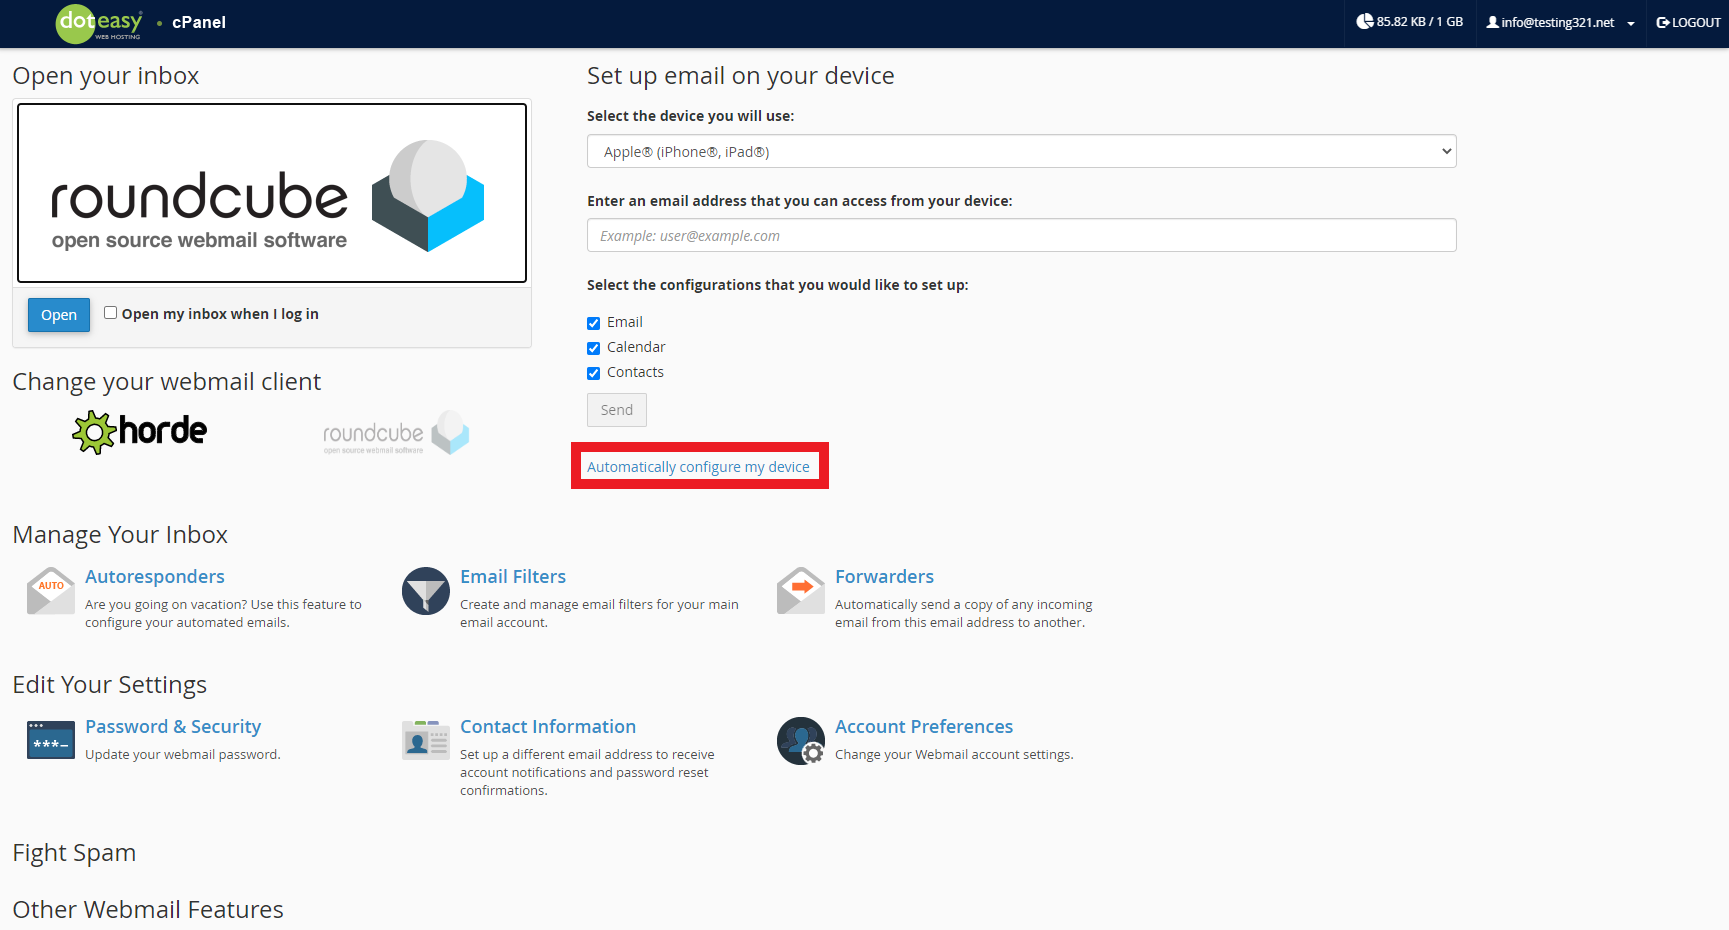
Now that you’ve created custom domain emails, you can put them to use. First, you’ll need to head to the Doteasy website and click “Webmail Login” in the top right corner of the home page. Log in using your custom domain email address and your password. Next, you’ll be taken to a dashboard. To access your email inbox, click the “Open” button on the left of this page. To access information that you can use to configure devices to let you access and use your webmail, click on the text that says “Automatically configure my device”.
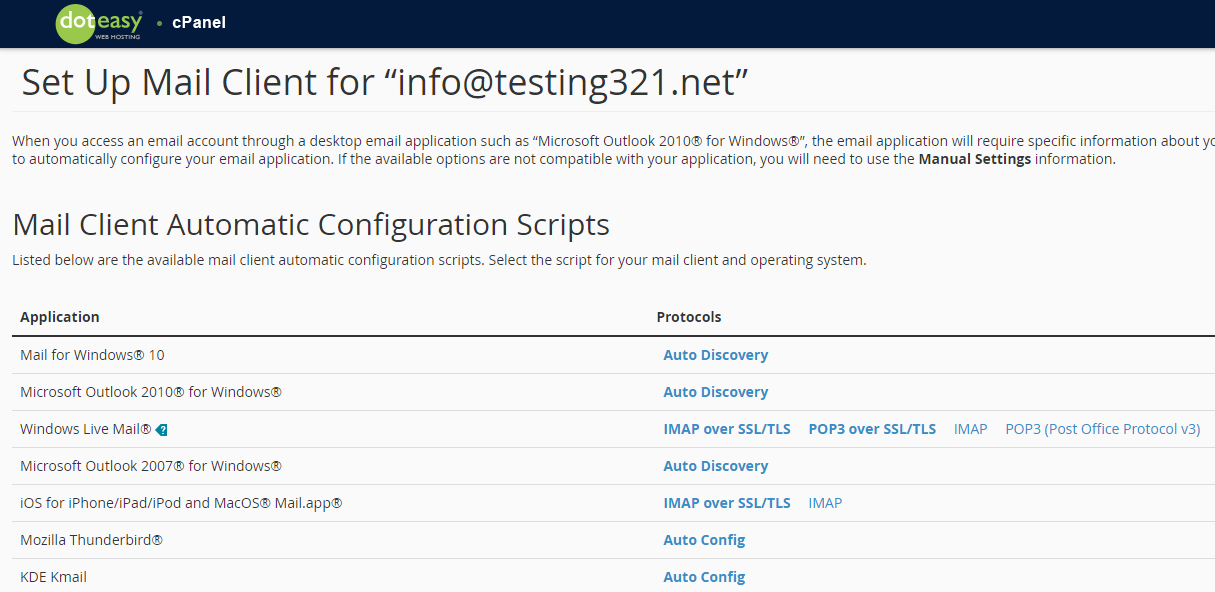
You’ll be brought to a list of popular email devices and apps. Click on the app you want to configure your mail client for and follow the instructions that appear from there.
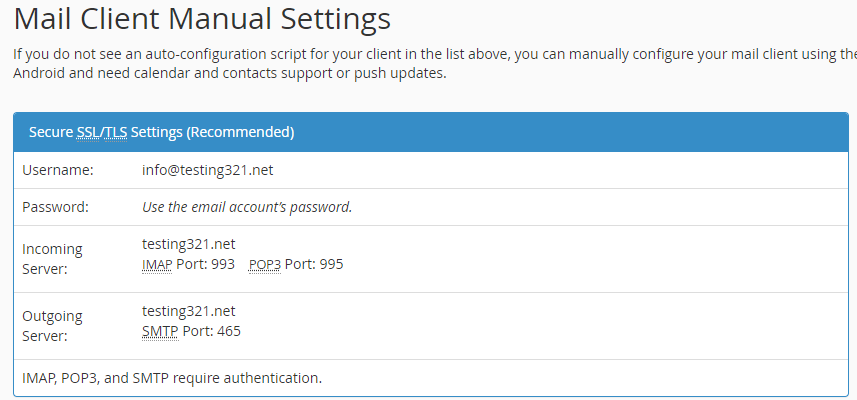
You also have the option to manually set up access to your mail using email programs such as Outlook, Thunderbird or other mail apps found on your phone or computer. Below the above image, you’ll find information that lets you manually configure access to your webmail client. This information can be used to connect any other device or app not previously listed.
Get custom domain emails with Google workspace
Part 1: Get Access To Your Email From Google Workspace
Email is vital to any website and/or business’s success. Besides getting a free custom domain email with your web hosts, alternatively, you may choose to purchase domain emails as a separate add-on option from providers other than your web hosts.
Google Workspace is an option you can consider for creating custom domain emails. Google Workspace is Google’s suite of applications designed for small businesses. Google Workspace lets you use the same Google apps that you might be familiar with, such as Docs, Drive, Gmail, Calendar, and Sheets, with your own domain name instead of the typical @gmail.com. By using Google Workspace, you can take advantage of Google’s spam filtering and security features for your custom domain email, its services’ accessibility across devices and apps, and its high reliability with minimal to no downtime.
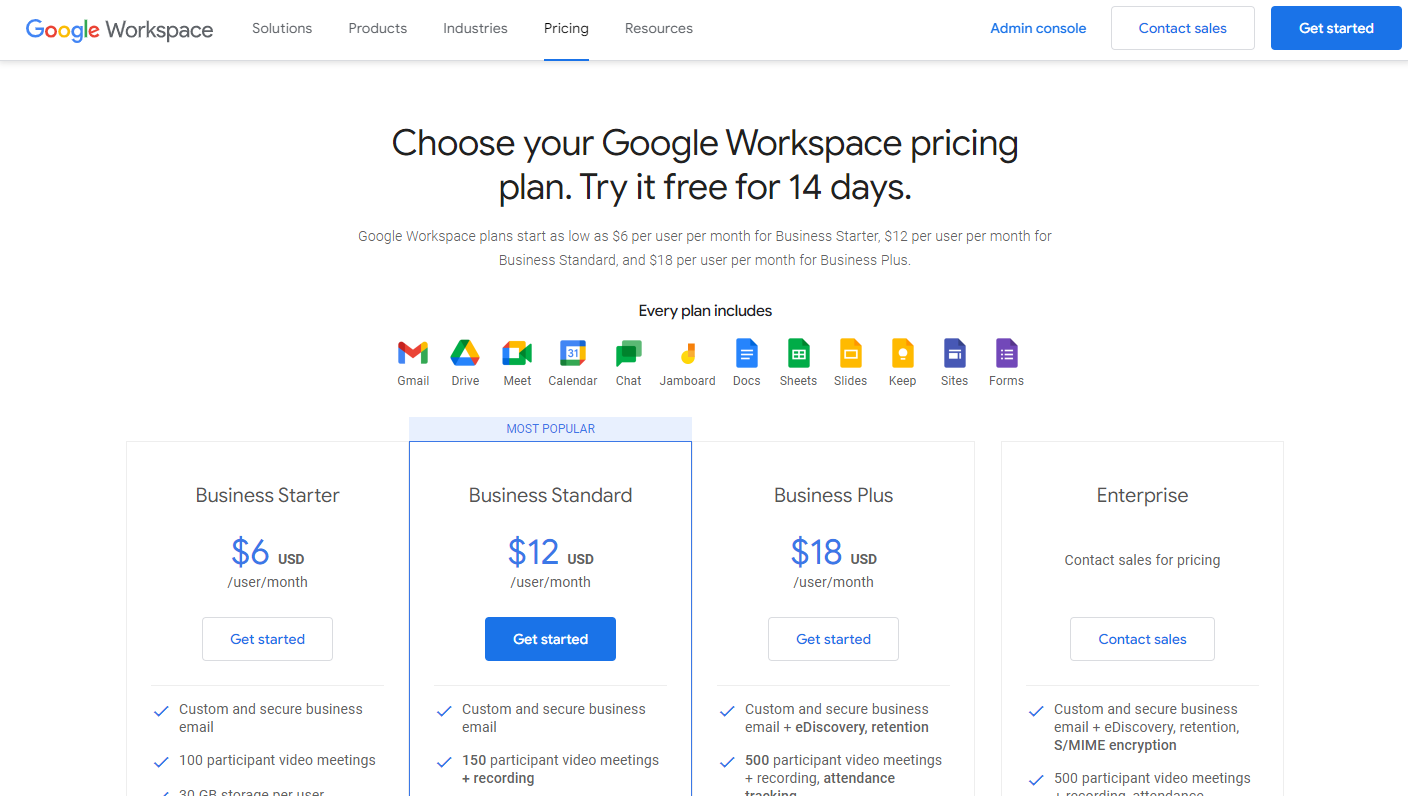
To get started, visit the Google Workspace website and choose a plan. Their plans begin at $6 USD monthly per user, and scale up in features and price as you continue up their selection of plans.
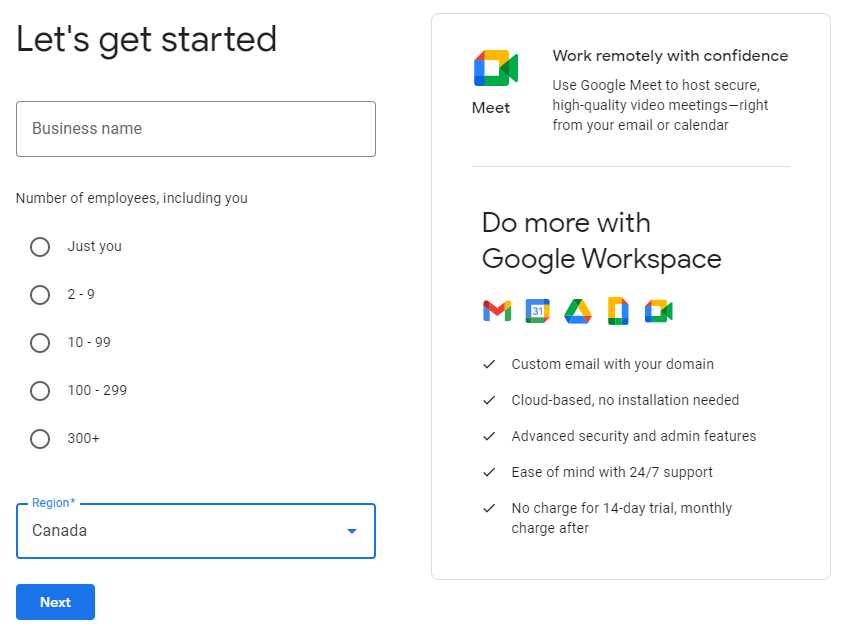
You’ll then need to fill out your company’s name, size, and country in which it’s located.
Afterwards, enter your contact information, then click on the Next button. You’ll now be brought to a selection screen where you can choose your domain. If you already have a domain name that you’d want to use, you can go ahead and use it here. If not, you can select the “I’d like to buy a domain” option. This lets you enter a domain name you’d want to register. Once you’ve done so, click the “Next” button to see if your entered domain name is available, along with how much the available domain name is priced at.
To confirm your decision, click the “Next” button. From here, you’ll enter your business information and payment details to finish the process of getting a domain to use for your custom domain email. Now you can click on the “Go to Setup” button to start adding and creating email accounts and users.
Part 2: Create Your Email Accounts
You can create your first email account on the setup screen. Afterwards, you have the option to add more accounts for other people, departments, and any other purposes you would need more accounts for. Once you’re happy with the number of accounts you’ve created for the time being, since you can always create more later, click the “Next” button.
You’re now ready to use your newly created custom domain emails in Gmail.
We will feature another article to provide the full steps on how to create a domain email with Google WorkSpace. Stay tuned for details.
Get custom domain emails with Microsoft Office 365
Part 1: Get Access to Your Email From Office 365
Office 365 is a suite of apps and services offered by Microsoft that allows access to Microsoft services you might be familiar with, such as Office, Excel, Outlook, and Teams, when you’re using just one Office 365 account to access them all. When using these services, you can be using a custom email domain instead of typical email domains like @outlook.com.
For certain web hosts that don’t offer domain email as an included service, you may purchase Office 365 as an add-on option, such as from within their own control panel. Alternatively, you also have the option of purchasing directly from the Office 365 website.
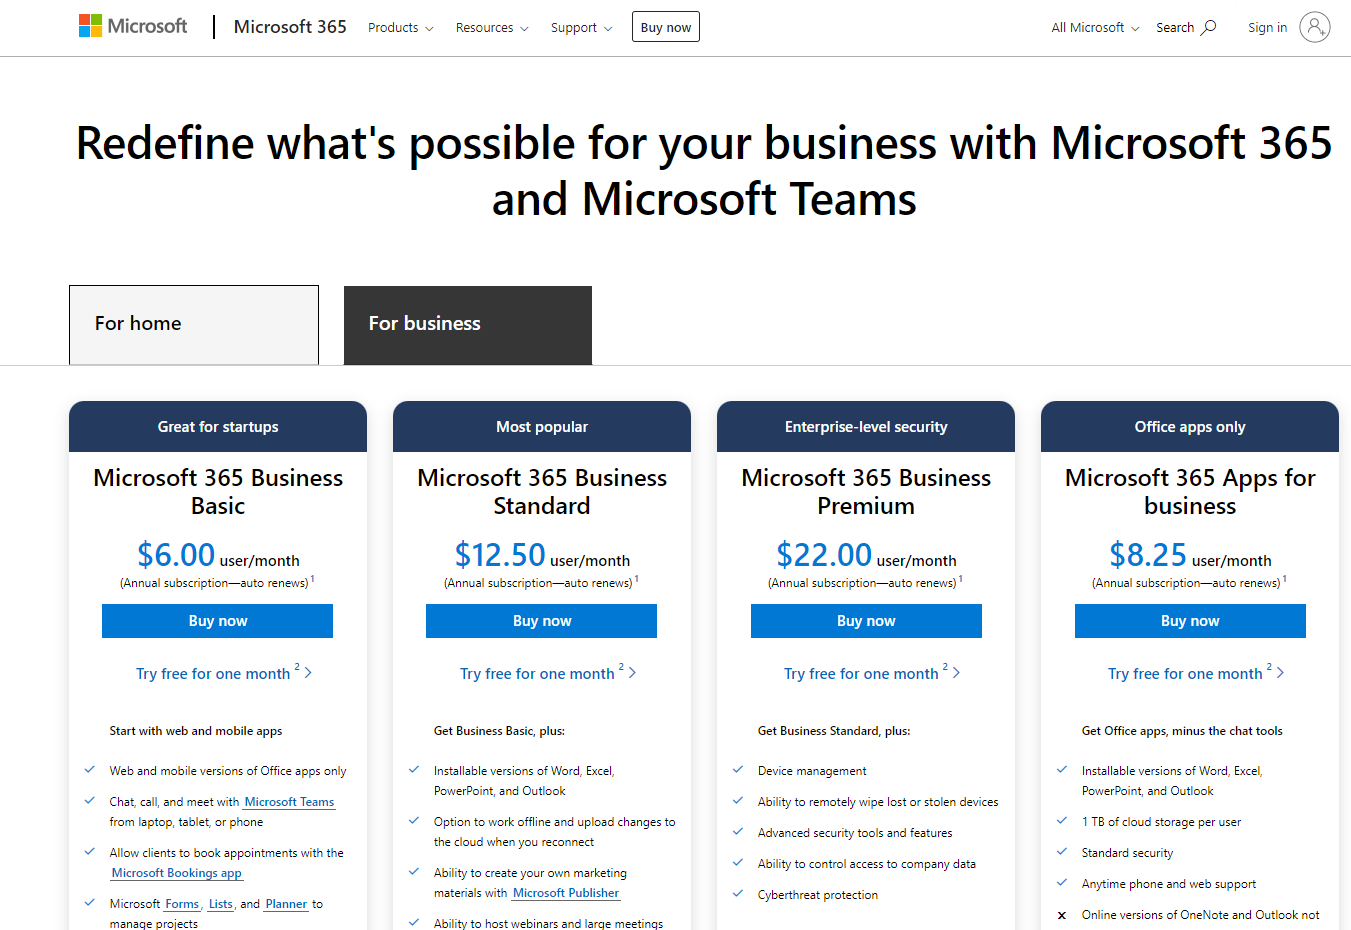
First, head to the Office 365 website. You’ll see a variety of plans available for you to choose from using. Click the “Buy Now” button for the plan you think suits you best. Their plans begin at $6 USD monthly per user and scale up in functionality and price as you continue up their selection of plans.
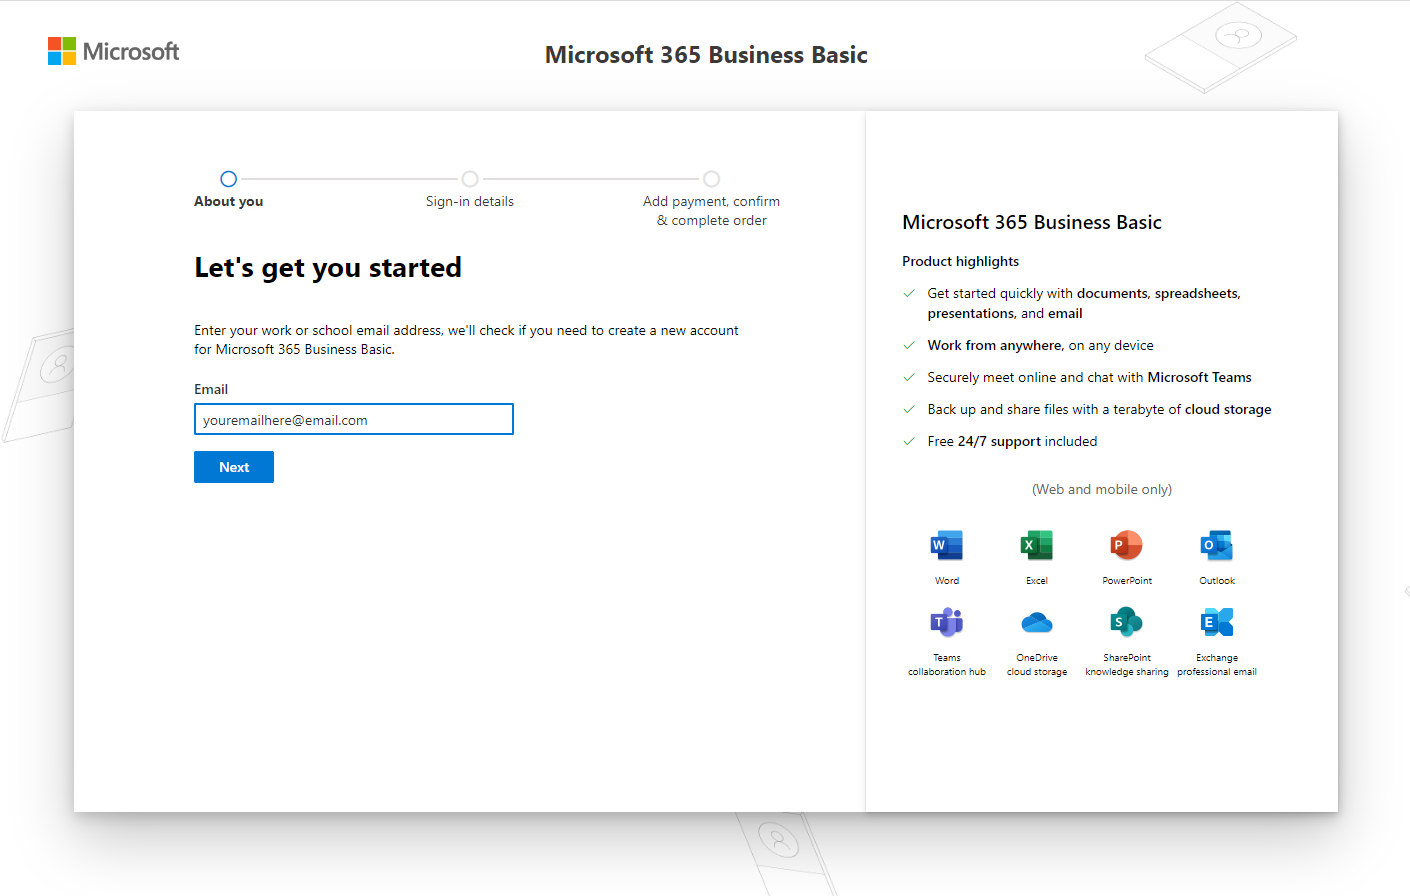
From here, you’ll be taken through a signup process, first to a page that asks you to provide your email address.
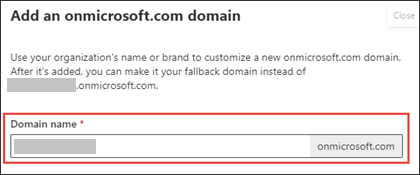
After this step, you’ll be asked for your business information and personal information. Then, you’ll be able to choose a domain name for your account. Microsoft only provides you with a subdomain, meaning you’ll need to purchase and add a custom domain name separately.
Image credit: Microsoft
Choose a fitting domain name for your business/site, then click the “Next” button. Fill in your payment information as the last step to completing your sign up process.
Part 2: Find Your Domain
Because Microsoft doesn’t provide domain registration services, you’ll need to use an existing domain name or separately buy a new domain name to add to your Office 365 email.
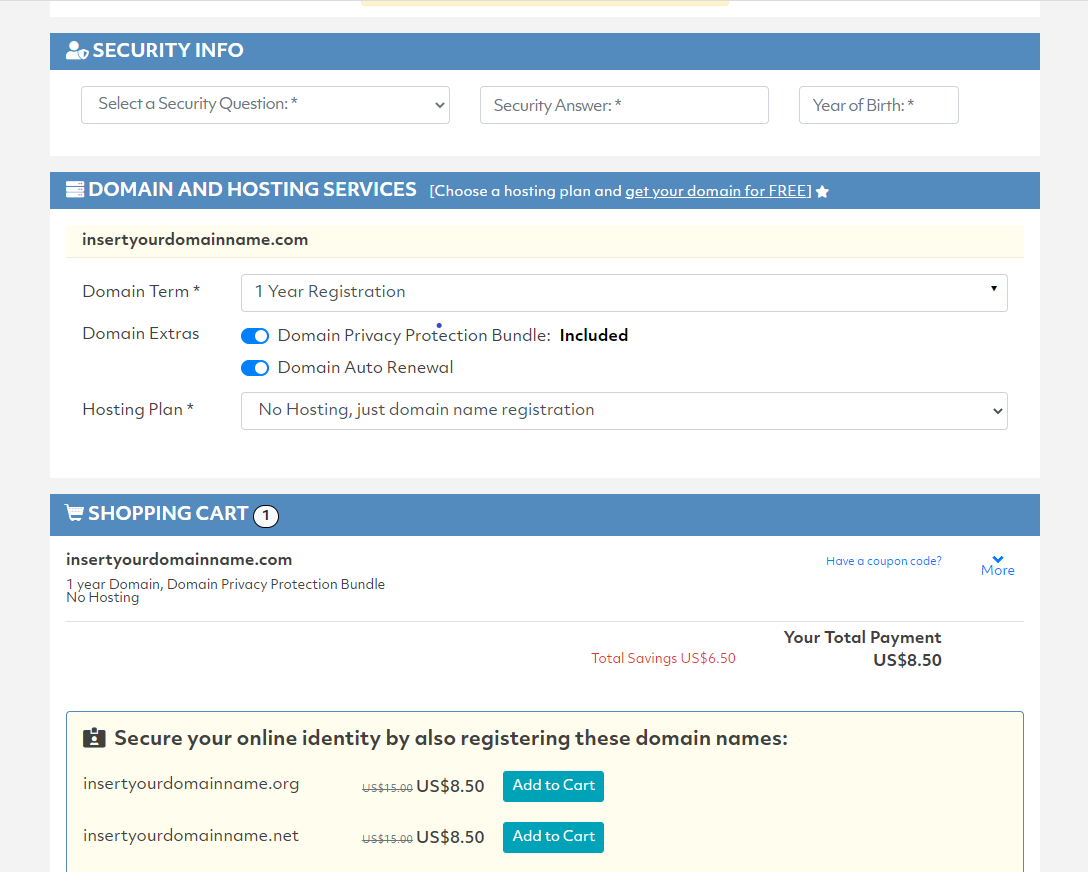
If you don’t have a domain name you can use, you can easily buy and register one for yourself. I recommend you use a domain registrar like Doteasy, which offers perks like private domain registration, a promotional price of $8.50 upon your first plan purchase and renewal price of just $15 annually, and responsive in-house customer support.
Head to the Doteasy website and click the “Sign Up” button. You’ll be asked to enter the domain name you would like to acquire. Enter it into the domain searcher to check if it’s available for you to use. If it is, you can proceed with using it, and if it’s not, you’ll need to find a different domain to use.
Once you’ve finished selecting an available domain name for you to use, you’ll move on to the payment process where you enter your account and payment information to complete your purchase. Take a look at any additional features available as part of your plan, to see if any are or are not suitable for you to want to include in your purchase. Once your payment is accepted and your purchase is processed, you’ll get an email from Doteasy detailing how to log into your account’s control panel. You’ll now have access to the domain you can use for your Office 365 email. You’re now ready to move onto the next step, where you add your domain to Office 365.
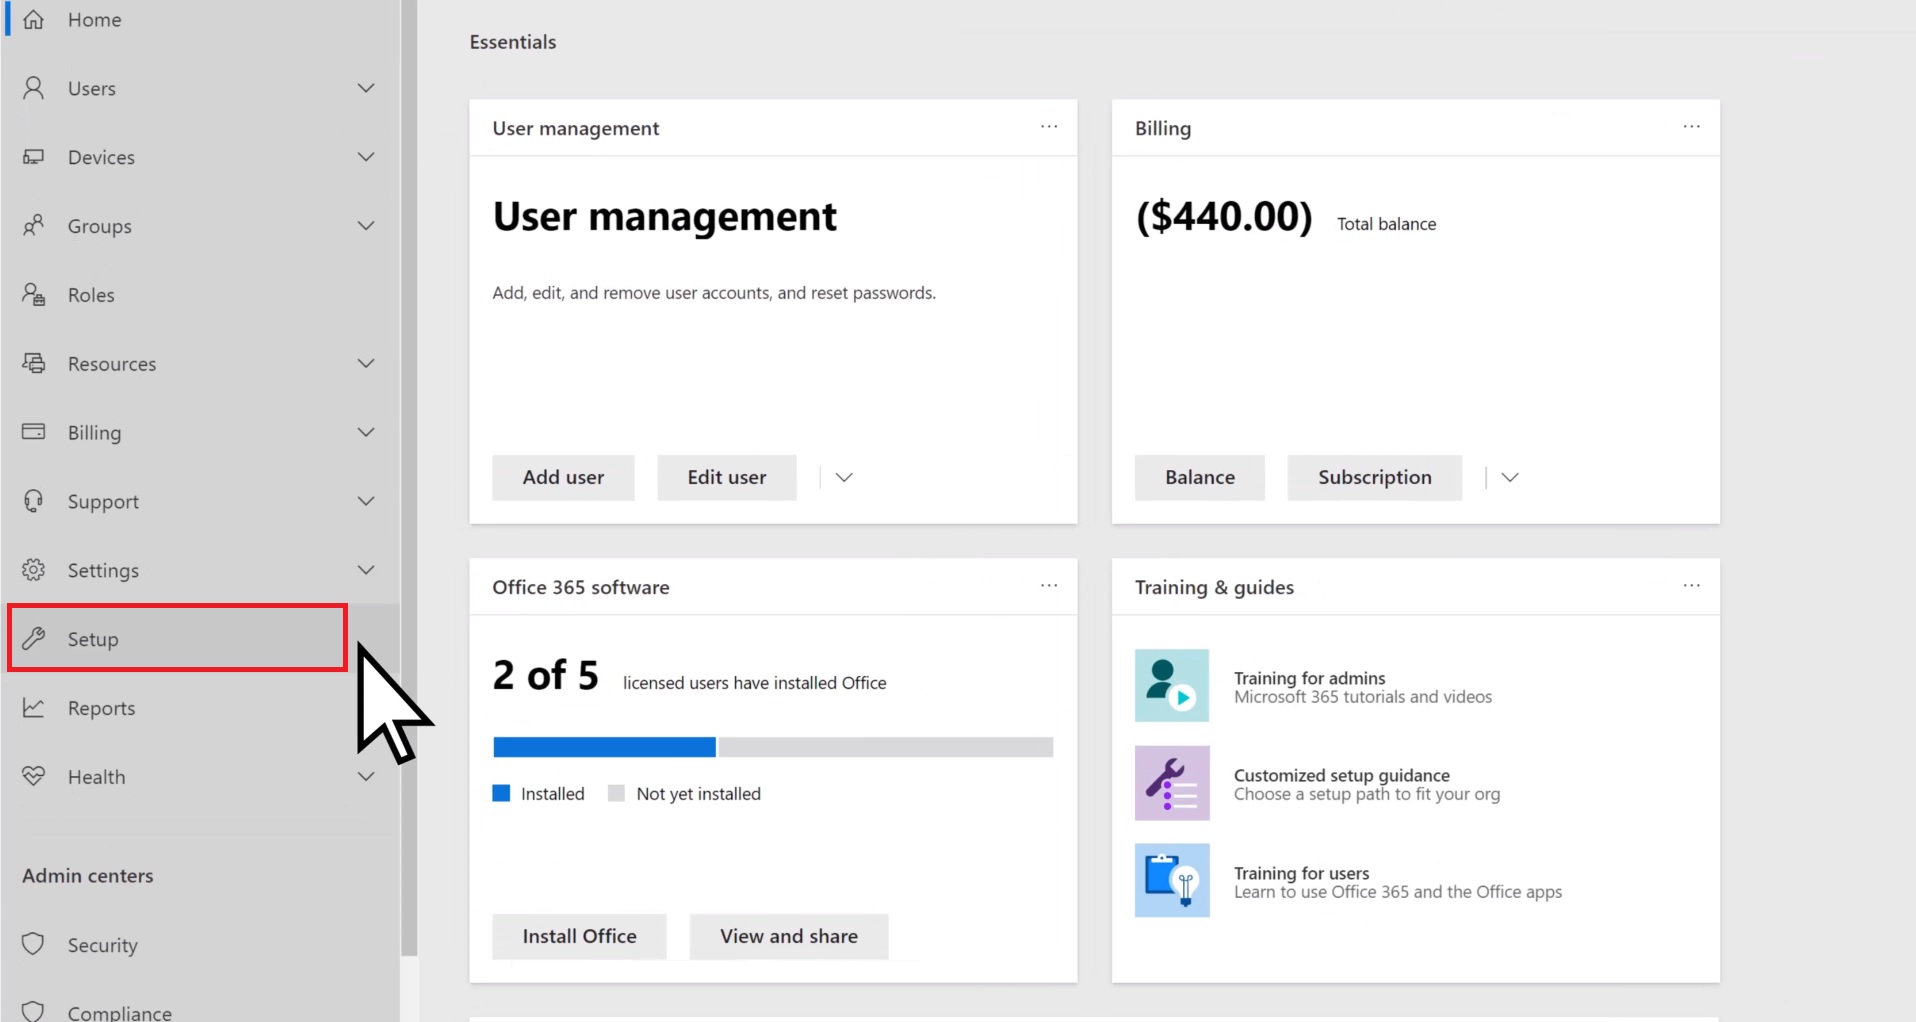
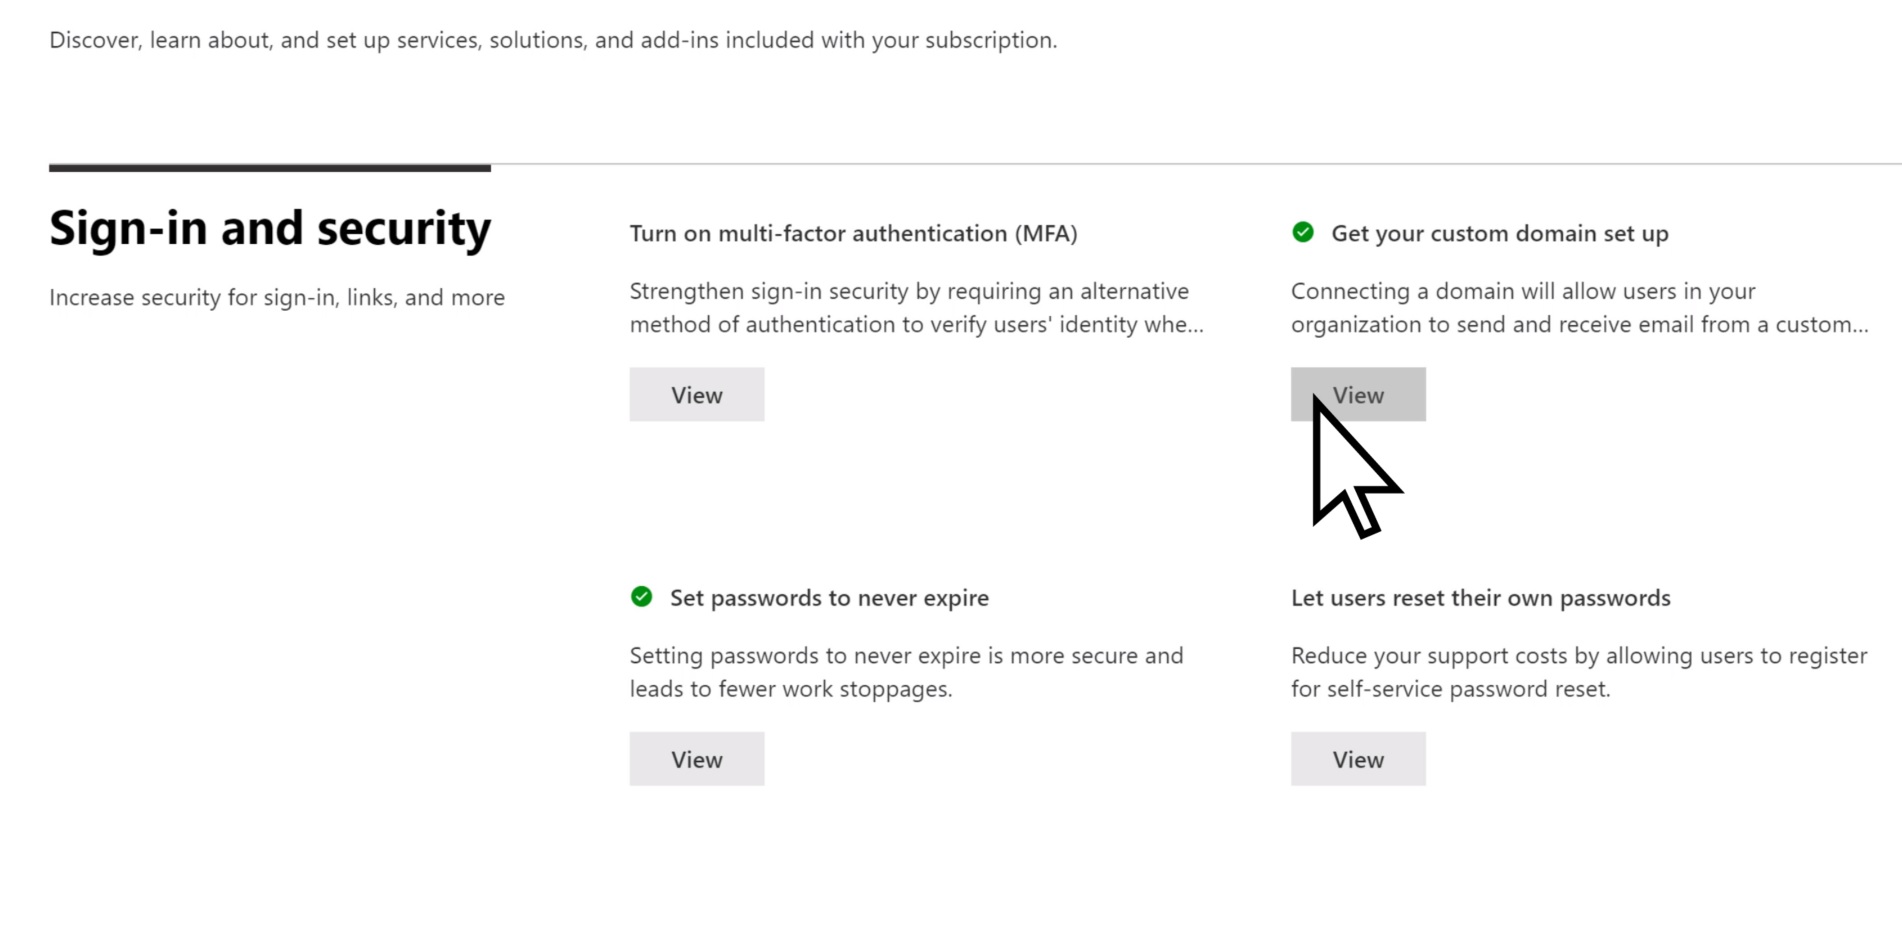
Go to your Office 365 admin dashboard and click the “Setup” section, then click the “Get your custom domain setup” page.
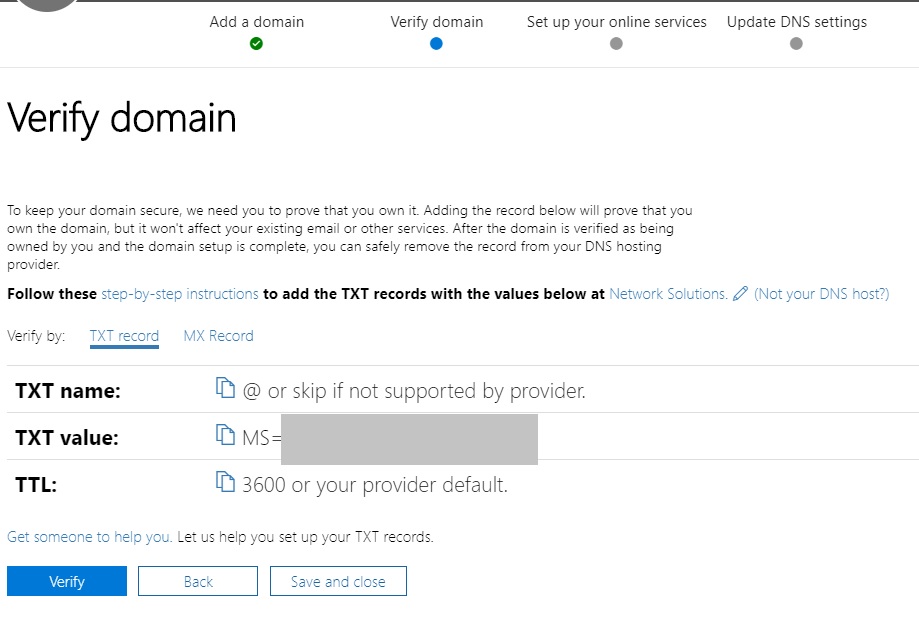
You’ll be asked to verify that you own the domain name you’re attempting to use with your Office 365 email. You’ll see TXT Record in this page that you’ll need for your registered domain’s settings. To verify that you own a domain, you’ll need to find the TXT name and TXT value for your domain to verify that you own it.
You’ll be entering these TXT records into your domain registrar, so take note of them here in Office 365 before you go.
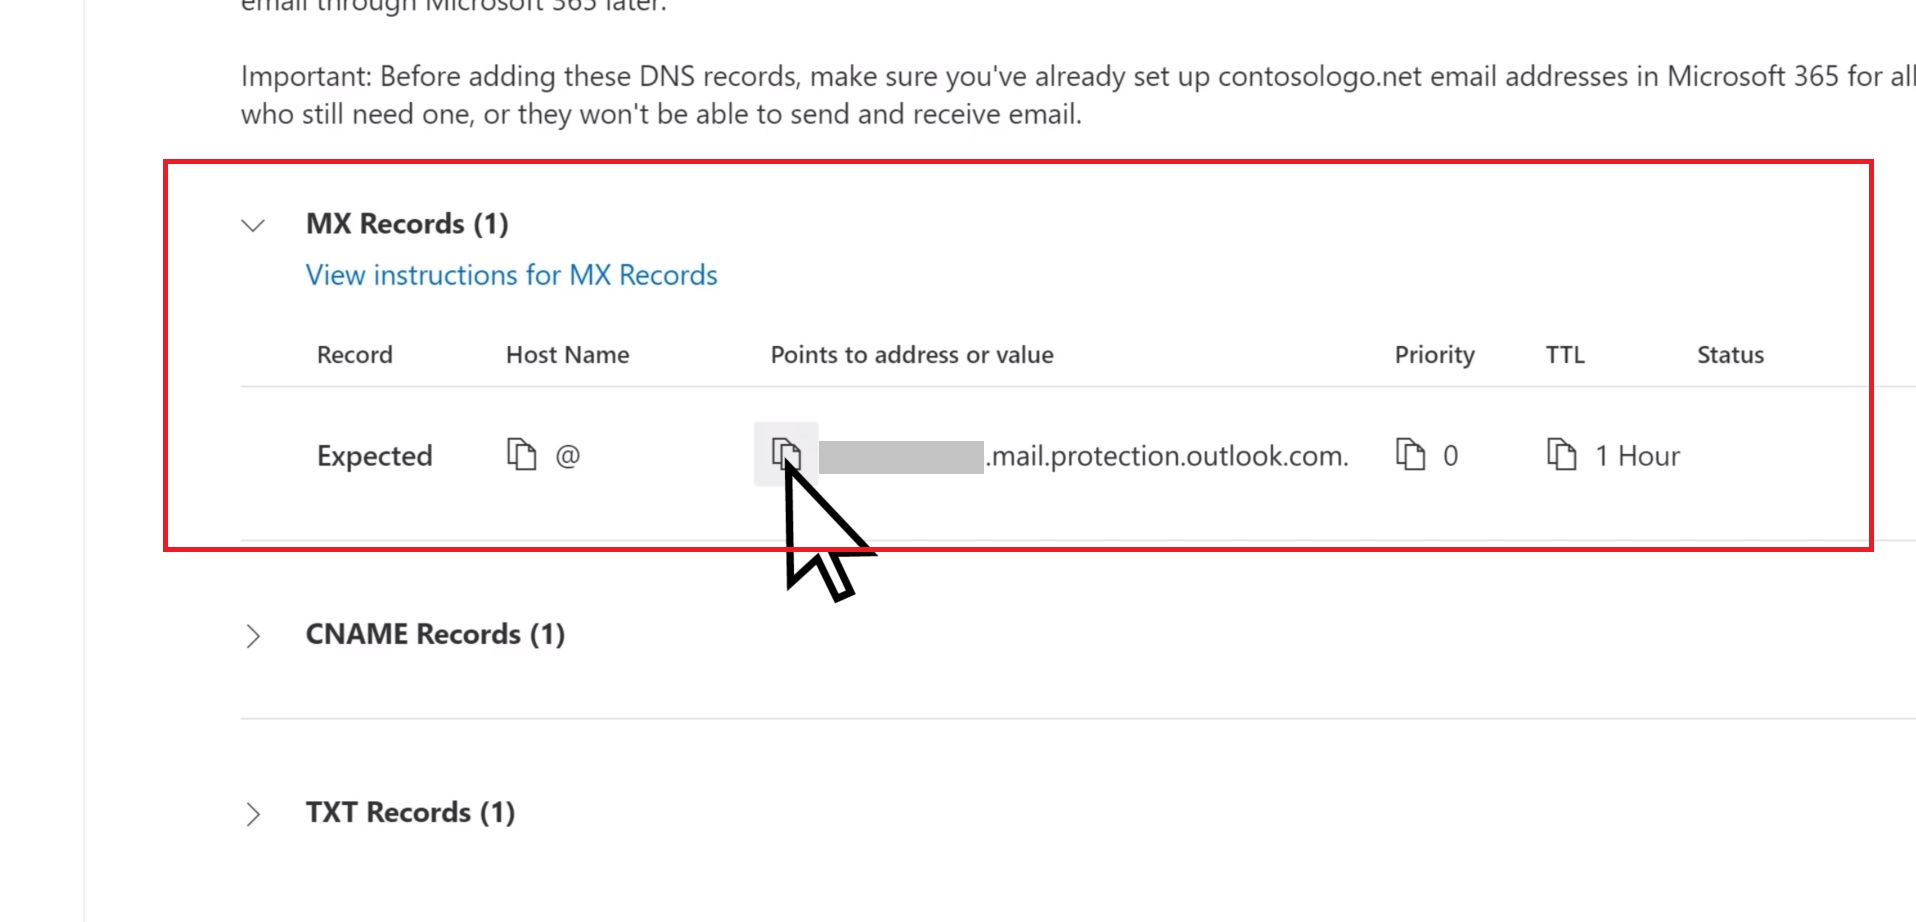
In addition, you’ll also need to find the MX records on Office 365 and add them to your domain name in your domain registrar panel. To find the MX records in Office 365, you can click “Settings” in the left sidebar and then click “Domains” to view the domain name(s) you’ve added onto your Office 365. Click the domain name you want to find the MX records. You will be prompted to the next page. Click the “Continue setup” button to proceed to the next page. Then, click “Continue” again to proceed to the following page. On this page, scroll down to the “MX Records” section and give it a click. You will now see the MX records.
Take note of these MX records here in Office 365 before you head back to your domain registrar.
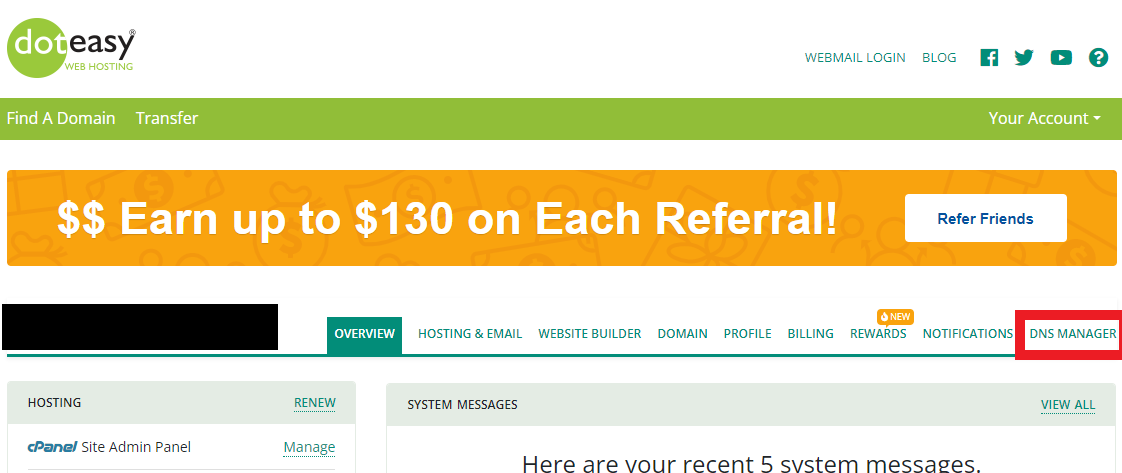
With your TXT records and MX records, go to the Doteasy website and log into the Doteasy member login in the top right of the home screen. In the menu bar to the right of your domain name, find the “DNS Manager” tab and click into it.
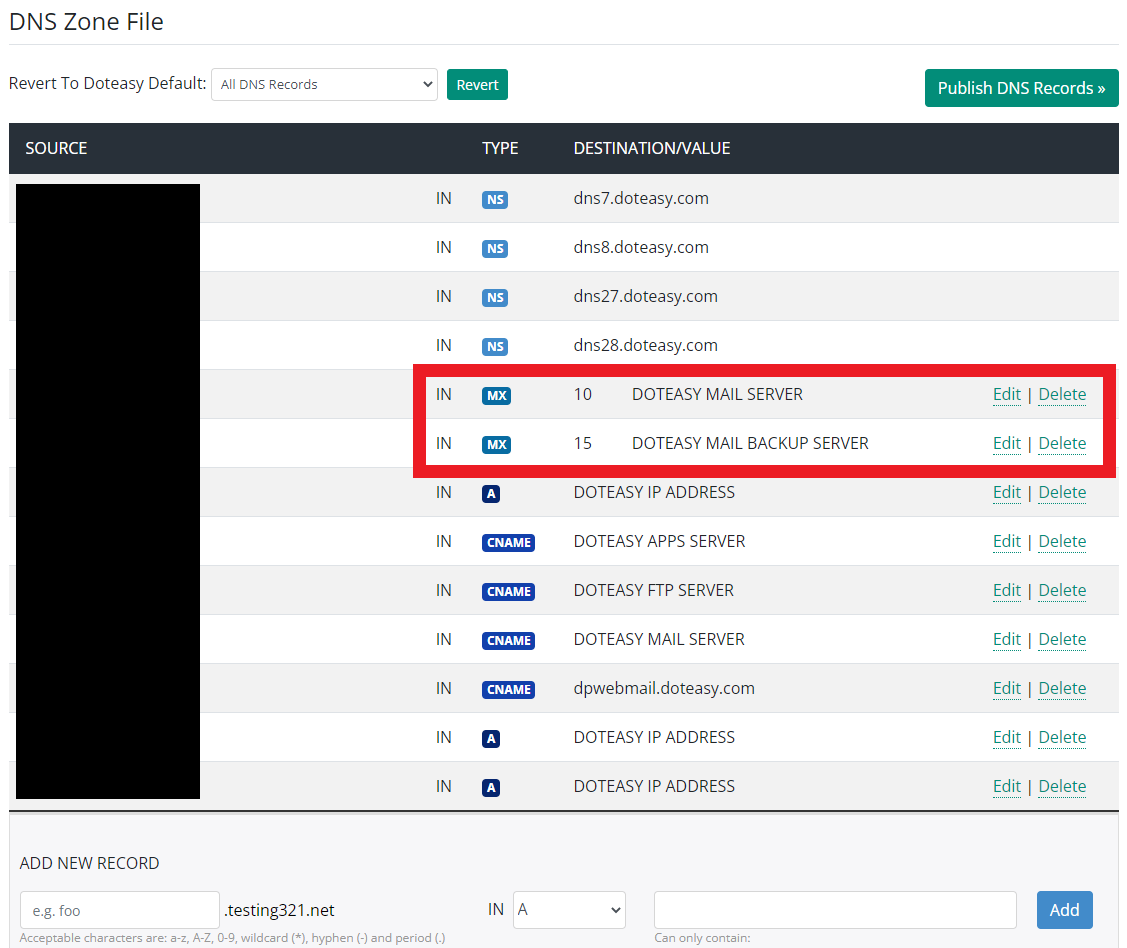
Scroll down and you’ll see rows of information under a section labelled “DNS Zone File”. This is the domain records table. The first thing you need to do is to add the TXT records to verify that you own the domain name. Scroll to the bottom of the page and you’ll see “Add New Record”. In this section, you will see 2 text boxes and 1 dropdown menu. In the first text box on the left, leave it blank. In the middle dropdown box, select “TXT”. In the second text box, enter the TXT value you copy from Office 365 (e.g. MS=12345678). Once these records are entered, click the “Add” button first, then click the “Publish DNS Records” button to publish the changes. You’ve now added the TXT record to verify the domain ownership.
Now, you are adding the MX records to your domain name. You can add the MX records on this same page under DNS Zone File first. Look for the record with the Type “MX”, go to the right of the bar that it’s placed in, and press “Delete”.
Note that the testing account that Doteasy provided us includes hosting and email features, meaning there were already MX records for the account we used in this tutorial. If you register a new domain name with Doteasy with their Domain Only Plan, you won’t see any MX records present in your new account. This means you can skip the deleting MX record steps and go directly to adding your MX record.
Now, scroll to the bottom of this page until you see the “ADD NEW RECORD” section. Leave the leftmost section blank. Select “MX” from the drop down menu in the middle of this section. For Priority, choose 0. In the rightmost section, enter the Value as provided by Microsoft (e.g. domain.mail.protection.outlook.com). Once you’ve filled out these 3 sections, click “Add”. Once you’re satisfied with the changes you’ve made, click “Publish DNS Records” at the bottom of this page.
Following this step, return to Office 365 and navigate to the “Setup” section, then the “Domains” page. Fill in the information you need to confirm your ownership of your domain name you want to use for your Office 365 email. Once this is complete, you will have successfully added your custom domain to your Office 365 account.
Part 3: Create Custom Domain Office365 Email Addresses
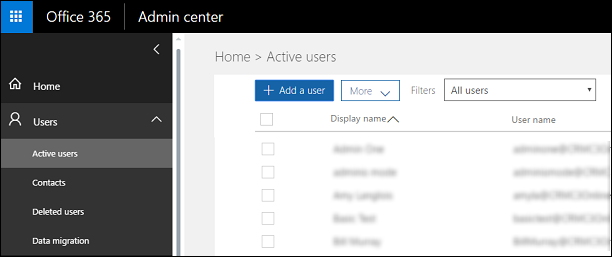
Now that your custom email domain has been added to Office 365, you can create custom business email addresses. From your Office 365 dashboard, click the “Users” section and click the “Active Users” page. From here, click the “Add a user” button.
Image credit: Microsoft
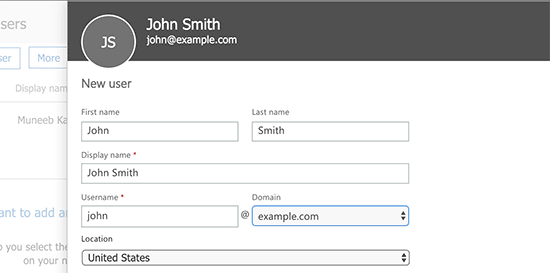
Next, you’ll be asked to provide the new user’s personal information, and then choose an email address for them to use. Once you’re happy with the information you’ve filled out, click the “Add” button to save these user settings.
Part 4: Using your Office 365 Custom Domain Email Address and Account
After having followed all the steps in this article, you’re ready to use your custom domain email address on Office 365 for any needs you might have. You can access Microsoft’s email service, Outlook, simply by going to Outlook.com. Log in using the email address you created earlier to access your email inbox and other services. Additionally, your custom domain email address can be used on phones and tablets thanks to the Outlook app.
Conclusion
Custom domain email addresses are simple to obtain and use. With both free and paid options available for you to choose from, professionalism for your website and business’s communications is easy to secure.
